Textual Instructions
-
How to update your website navigation
-
Template Navigation
-
Flash Tab Navigation
-
-
How to update your "Company Name" and tagline
-
Company Name graphic logo
-
Static tagline
-
Flash header tagline
-
-
Removing a flash intro (not required in this template)
How to update your website navigation
| Navigation (these items are editable using FrontPage navigation -- click here to learn about FrontPage navigation): |
| To edit these buttons you will need to modify the FrontPage navigation. |
|
|
| Flash Tab Navigation (these items are Flash buttons which are updatable by editing a text file): |
| To modify this menu, you will need to edit the "flash/navigation.xml" file with any text editor (or FrontPage). There is a video tutorial available at www.luckymarblehelp.com/tutorials describing in some detail about how to edit the file. |
|
|
Instructions:
- Open up the config file
- Modify each of the values
- Save the config file
Summary of name/value settings:
- _x - horizontal location of the tab/subtab relative to the top left corner of the entire movie, or bottom left corner of the parent tab
- _y - vertical location of the tab/subtab relative to the top left corner of the entire movie, or bottom left corner of the parent tab
- url - where you want the tab/subtab to link to
- title - what you want to be displayed on the tab/subtab (note, there IS a limit at about 20 characters for a subtab, 10 characters for a tab)
Editing your PayPal ECOMMERCE Pages
| Step 1 Update your PayPal email for the "view cart" button (only need to do this once) |
| 1) open the "includes/cart_buttons.htm" page |
|
2) switch to HTML/Code view |
|
3) find the code "sales@yourweb.com" |
| 4) replace with your PayPal business email address |
| 5) save the page |
| Step 2 Update your PayPal email for the "add to cart" button (only need to do this once) |
| 1) open the "includes/paypal_email.htm" page |
|
2) switch to HTML/Code view |
|
3) find the code "sales@yourweb.com" |
| 4) replace with your PayPal business email address |
| 5) save the page |
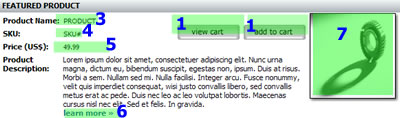
| Step 3 Update the Product Name (you must do this for each product) |
| 1) open up the page containing the product with FrontPage |
| 2) double click on the product name (#3 in the image above) |
|
3) change the "initial value" to whatever product name you want to display |
|
4) click Okay |
| 5) save the page |
| Step 4 Update the Product SKU (you must do this for each product) |
| 1) open up the page containing the product with FrontPage |
| 2) double click on the product name (#3 in the image above) |
|
3) change the "initial value" to whatever product sku you want to display (must be unique in order for PayPal cart to work) |
|
4) click Okay |
| 5) save the page |
| Step 5 Update the Product Price (you must do this for each product) |
| 1) open up the page containing the product with FrontPage |
| 2) double click on the product price (#3 in the image above) |
|
3) change the "initial value" to whatever price you want to display (this is what will be transmitted to PayPal) |
|
4) click Okay |
| 5) save the page |
| Step 6 Update the Learn More Link (you must do this for each product) |
| 1) open up the page containing the product with FrontPage |
| 2) double click on the learn more link |
|
3) switch to HTML/code view |
| 4) change the "store/product_detail_pages/product_detail_page_1.htm" page location to the location of your product details page, relative to the folder that the page you are editing resides in. |
|
5) switch back to Design/Normal mode |
| 6) save the page |
| Step 7 Update the Product Image (you must do this for each product) |
| 1) open up the page containing the product with FrontPage |
| 2) double click on the image |
|
3) switch to the "general" tab and then browse for your product image (best to be 125x125) |
|
4) click Okay |
| 5) save the page |
How to update your "company name"
| Company Name (in Product Details Pages) | |||
|
|||
|
|
| Tagline (in template pages) -- REQUIRED SOFTWARE : FrontPage / Dreamweaver / HTML Editor |
|
| Tagline (in flash header) -- REQUIRED SOFTWARE : FrontPage / Dreamweaver / HTML Editor / text editor |
|
|
|

How to update your "flash images " on the Page Layout 1-3 pages
Instructions:
Summary of name/value settings:
Note: there MUST be an ampersand (&) and the beginning AND end of each name/value pair as is in the original config files. This is so that each configuration could be displayed on its own line. Example: NOTE: If you are changing the images the image doesn't load, it could be because your export settings are set to "progressive" JPG format. Make sure this is NOT the case, then re-export your image. |

Changing the Background Header Image, and small images
| Changing the Background Header Image (please see www.luckymarblehelp.com/tutorials for a video tutorial on this topic) |
| 1) make a new background image 686x146 (width x height) |
|
2) save it as "template_dwt/graphics/header-bg-image.jpg" |
| NOTE: If you are doing this and the image doesn't load, it could be because your export settings are set to "progressive" JPG format. Make sure this is NOT the case, then re-export your image. |

Changing the Small Flash Header Images
| Changing the Small images in the flash header (please see www.luckymarblehelp.com/tutorials for a video tutorial on this topic) |
| 1) make a new image 100x80 (width x height) |
| 2) save it as "template_dwt/images/header-image_x.jpg" |
|
3) replace the 'x' with a number 1-4, as in the examples below. |
| NOTE: If you are doing this and the image doesn't load, it could be because your export settings are set to "progressive" JPG format. Make sure this is NOT the case, then re-export your image. |
 |
 |
 |
 |
| header-image_1.jpg | header-image_2.jpg | header-image_3.jpg | header-image_4.jpg |
| Updating the icon names and links |
| 1) open up the "template_dwt" folder |
|
2) open the 'flash' folder The icons are listed in the following order, from 'left to right' To change the 'link' for the first icon button located on the left, edit the first line, and continue down the list &homeURL=../index.htm EXAMPLE: to change the first icon link from the index.htm page to a default.html &homeURL=../index.htm ///// &homeURL=../default.htm To change the 'name' the icon displays, edit the second group of text, changing ONLY the word after the "=" sign. &icon1Text=Home& Example change the first icon from home to Welcome would look like this &icon1Text=Home& ////// &icon1Text=Welcome&
|